Setting up SSH with GitHub
Wonderful tutorial from Github itself
Do this first! If you have an ssh key that’s in ssh-agent you are less likely to get a password prompt when ssh’ing into CSUA. It’s also necessary if you want to push to Github from CSUA.
How to set up CSUA
- Create an account
- Copy the
id_rsa.pubfile you created earlier. SSH to latte, create a `~/.ssh/authorized_keys’ file and copy the public key there. - It should be possible to
sshto[yourusername]@latte.csua.berkeley.edunow. For convenience, you could add the following to your~/.ssh/configfile so thatssh csuajust works.Host latte HostName latte.csua.berkeley.edu User YOUR_USER_NAME IdentityFile PATH/TO/PRIVATE_KEY
Other tips:
ssh -A will keep your credentials. So, for instance, if you have Github SSH acccess on your machine, -A will allow you to push to Github from your CSUA machine.
ssh -i path/to/key if you need to authenticate with a specific key.
There is another machine, [yourusername]@soda.csua.berkeley.edu which does not have GPUs. It’s kind of like an extra hive machine. Maybe extra CPU for your 170 project :)
How to set up Jupyter
Open two terminal windows, A and B.
In window A, ssh latte (or ssh username@latte.csua.berkeley.edu) and then install jupyter.
Run jupyter notebook --no-browser and check which port it’s using (in its terminal output).
There should be a line http://localhost:8888/?token=088de52ac910000087c9c24a15de8a0c68665ab1c2ee0687 or something like that.
Then in window B, run ssh -N -L [to]:localhost:[from] [username]@latte.csua.berkeley.edu
from is the port that Jupyter is running on CSUA (the number that you saw earlier). to is the port you want to connect Jupyter to on your machine. Ideally, you would set this to from as it makes everything easier. But if from is in use, you can find an open port by
- Run Jupyter on your machine, note which port it uses
- Kill Jupyter, use that port as from.
Keep the ssh running. Now, in a browser, copy the line from above, but change the port number to to.
Example http://localhost:8888/?token=088de52ac910000087c9c24a15de8a0c68665ab1c2ee0687
so from is 8888.
but to is 8890.
then you would want to open the URL
http://localhost:8890/?token=088de52ac910000087c9c24a15de8a0c68665ab1c2ee0687
in a browser.
It should connect to Jupyter.
It asked for a token??
This happens sometimes.
- Make sure you forwarded the correct from port. If you are connecting to someone else’s CSUA server, your token will be rejected.
- Make sure you copied the full token in the URL.
- Try using
localhost:[to]:localhost:[from]in thessh -N -Lcommand. - Try entering the token manually when Jupyter asks for it.
Working with CUDA
nvidia-smi is a wonderful CUDA command. It will list the GPU usage.
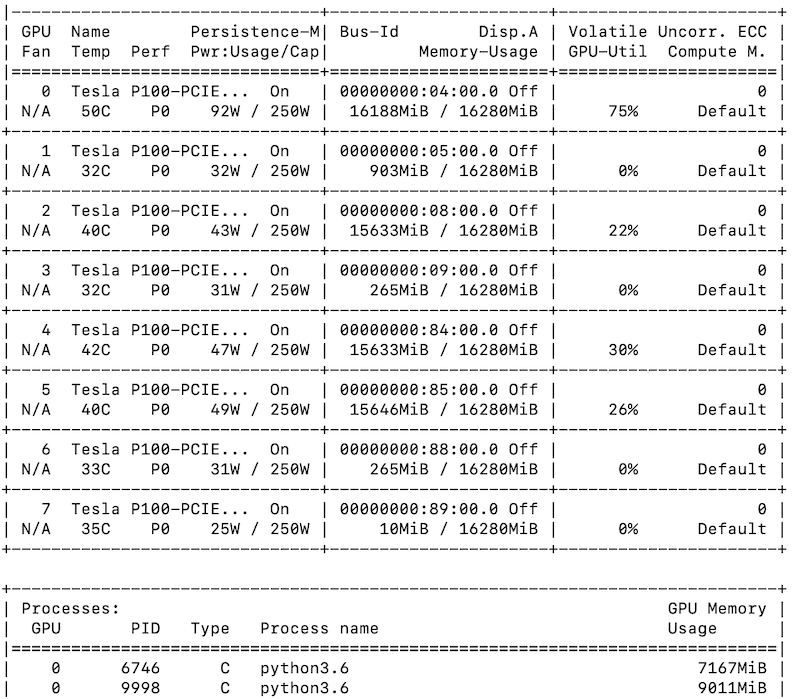 {.invert}
You want to use GPUs with low Volatile GPU-Util and low Memory-Usage.
However, CSUA will by default assign you two random GPUs.
You can see which ones these are with echo $CUDA_VISIBLE_DEVICES.
If these are busy GPUs, or they are two of the same GPU (e.g. having a CUDA_VISIBLE_DEVICES of 0,0 will confuse Pytorch!) you may want to reassign them.
If you want to use more than two GPUs… well once I used 8 GPUs and my program was canceled along with a warning message. Be a good citizen :) many people want to ML on this cluster!
If you want to set your GPUs to, say, 6 and 7 run the command export CUDA_VISIBLE_DEVICES=6,7. It’s that simple! There are 8 GPUs available, numbered 0 through 7.
The magic of tmux and JupyterLab
If you are training a network for a long time always launch tmux first. tmux keeps running even if you’re disconnected from the SSH server. (You can reconnect to the window with tmux a #. There are many many other tmux commands, I would recommend searching online for a quick guide or cheatsheet)
One of the most wonderful things about tmux is that you can run a Jupyter notebook server from within it! And even if you disconnect and reconnect to that server with ssh, all of your notebook states will be preserved and everything will just work!
And if that weren’t enough… why not install and run a JupyterLab server instead? It’s like Jupyter notebook but has a file browser, tabs, and built-in console. And if you run it in tmux, you don’t have to worry about losing any of your work, even if your SSH connection dies!
Just remember, when you start up tmux your custom CUDA_VISIBLE_DEVICES value and virtualenv will be reset, so you will need to set those again in the tmux window.
Tensorflow, Pytorch, and virtualenv quickstart
Create a virtualenv with python3 -m venv [name-of-env]. When you’re in the virtualenv your terminal will have a (name-of-env) before the prompt.
Using virtualenv with Jupyter: There can be weird issues where Jupyter is not in the virtualenv. To fix this, you can install jupyter in the virtualenv or just add your virtualenv as a Jupyter kernel (see https://stackoverflow.com/questions/42449814/running-jupyter-notebook-in-a-virtualenv-installed-sklearn-module-not-available)
You can exit the environment with deactivate, and enter it with source [name-of-env]/bin/activate.
Install Pytorch with pip, then run this notebook to make sure GPU access is working. (You can download it to CSUA using wget or curl).
Want to talk to your buddies on the CSUA server?
Run who to find the list of users currently on the server.
To write someone a message, just type write [username] [tty] and hit enter, then spam as much as you’d like.
For example, write user1 pts/8.
Be a good citizen and use /datasets
This is if you want to share a large dataset with others. It helps prevent the nightmare scenario where latte runs out of space and programs no longer work properly (this has happened in the past…)
Anyway, you may find this information on symlinks helpful. In essence, you can have a “folder” that is actually a link to /datasets and a program that depended on a dataset being downloaded in the same folder will just work!